
Setting Up a Dedicated Bot VPS
It's Virtually Private!
First off, thank you to several readers who reminded me that I promised a guide to setting up a VPS for botting at the end of THIS post, but then never wrote it!
Using a VPS is a life skill, so I’ve made this a free post and opened comments to everyone.
What is a VPS?
VPS is an acronym meaning Virtual Private Server. They are commonly create-on-demand virtual machines running inside a powerful server, hosted in a high-availability data center. “Virtual” refers to the fact that your particular server exists inside a virtual machine, which is a software or quasi-hardware separated environment for running an isolated operating system. “Private” refers to the fact that your server is not accessible to other users with servers running on that particular physical machine. Each VPS will come with a dedicated IP (or IPs), storage, and some defined claim on processing time.
Often when you see the term “cloud computing”, what is being described is a VPS. I pay some provider for a slice of their available computing power, and in return I get access to low latency, high availability, and the promise that my data is kept secure in their facility.
Who Offers VPS?
Many of the larger web3 players use Amazon Web Services (AWS) for infrastructure. There are several others, including DigitalOcean, Hetzner (popular for European users), and Linode.
How Much?
Typically a VPS on a shared server costs between $5 - $10 per month.
🚨🚨🚨 SHILL ALERT 🚨🚨🚨
I will provide several links below to the VPS providers I just mentioned. The link to Linode contains a referral code connected with my account. If you sign up with it, you’ll get a $100 credit, good for 60 days. If you remain a customer for another 6 months or so, they will give me a $25 credit to offset my own server bills.
If you’re turned off by referral codes, feel free to sign up with someone else or visit linode.com the old-fashioned way to bypass that completely. I don’t use AWS, DigitalOcean or Hetzner, and have no referral codes on those links.
I host my VPS on Linode, and this guide will demonstrate the process for setting up with them. If you choose another VPS provider that’s OK. They all offer similar configuration choices for operating systems, storage, and remote access.
In the end, Linux is Linux. Once you have the OS handled, everything else is easy to replicate across multiple providers. If you use the Linode credit to practice setting up and tearing down servers, you’ll have the skills to move your infrastructure around without much trouble at any time.
From this point, I assume you’ve created an account and have access to the control panel at cloud.linode.com.
Create a Server
When you access the control panel, you’ll see a prominent option labeled Create. Click it, then click the option to create a “Linode” High Performance SSD Linux Server (this is a VPS).
You will be presented with several options for the new server. I am configuring this example server with the following options:
Distribution Image: Ubuntu 22.04 LTS
Region: Newark, NJ
Most web3 infrastructure (including my preferred RPC, Moralis and Avalanche mempool service Snowsight) have their servers on the US East region. Choosing a VPS data center nearby will reduce latency.
Linode Plan: Shared CPU / Nanode 1 GB
Linode Label: degenbot-vps
Tags: None
Root Password: [redacted]
Write this down or save it in a password manager, you’ll need it to access the server remotely.
SSH Keys: None (if you have an SSH key already, add it here. Otherwise disregard, we will set one up manually later.)
VLAN: None
Add-ons:
Backups: Enabled
Private IP: Disabled
Once this is done, click Create and your VPS will begin to provision (the virtual machine is created, operating system copied to its storage, and an IP is assigned at the server firewall).
If you click the various headers (Analytics, Network, Storage, Configurations, Backups, Activity Feed, Settings) you’ll find useful information about your VPS.
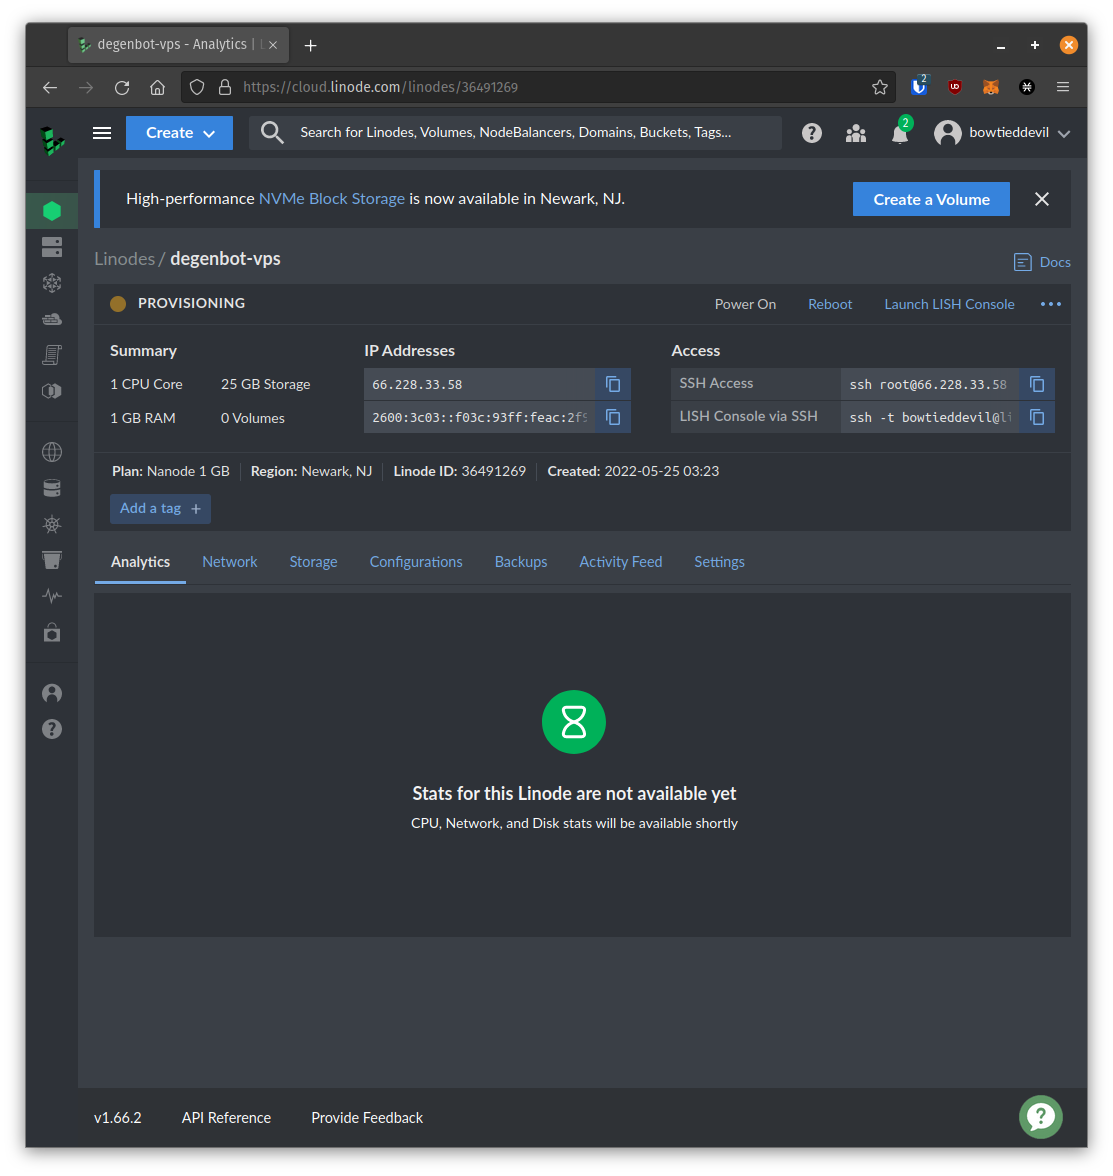
Wait until the server finishes provisioning (a minute or two), then you will see the status change to RUNNING with a green light.
Now we’re ready to access the server.
Connecting to the Server With SSH
I will not cover SSH in great detail. I’ve already written a lot about it on my free Linux-specific blog at bowtieddevil.com, so please check that out and do some web searches if you want to learn more.
If you’re using Windows and need an SSH client, I recommend PuTTY.
If you’re using MacOS or Linux, SSH is probably pre-installed so you won’t need to install a separate package.
Open a terminal and connect to your new VPS:
devil@hades:~$ ssh root@66.228.33.58
The authenticity of host '66.228.33.58 (66.228.33.58)' can't be established.
ED25519 key fingerprint is SHA256:l1dJaiChif4RSRrG1LOM07VzEfzIXSoNniW7p1huFEo.
This key is not known by any other names
Are you sure you want to continue connecting (yes/no/[fingerprint])? yes
Warning: Permanently added '66.228.33.58' (ED25519) to the list of known hosts.
root@66.228.33.58's password:

Welcome to Ubuntu 22.04 LTS (GNU/Linux 5.15.0-27-generic x86_64)

 * Documentation:  https://help.ubuntu.com
 * Management:     https://landscape.canonical.com
 * Support:        https://ubuntu.com/advantage

  System information as of Wed May 25 03:34:02 AM UTC 2022

  System load:           0.080078125
  Usage of /:            9.8% of 24.05GB
  Memory usage:          15%
  Swap usage:            0%
  Processes:             96
  Users logged in:       0
  IPv4 address for eth0: 66.228.33.58
  IPv6 address for eth0: 2600:3c03::f03c:93ff:feac:2f9b

The list of available updates is more than a week old.
To check for new updates run: sudo apt update


The programs included with the Ubuntu system are free software;
the exact distribution terms for each program are described in the
individual files in /usr/share/doc/*/copyright.

Ubuntu comes with ABSOLUTELY NO WARRANTY, to the extent permitted by
applicable law.

root@localhost:~#
Note that when you’re prompted for the password, the console will not display anything. Type it by hand, or paste your password from the clipboard using CTRL+SHIFT+V.
Ubuntu tells me that there are some package updates, so I’ll apply them:
root@localhost:~# apt update
[...]
root@localhost:~# apt upgrade
[...]
It tells me also that a kernel update is available, so I plan to restart. I choose “Cancel” when presented with the option of restarting services, which takes me back to the command line.
Now I reboot the VPS.
[...]
Restarting services...
Service restarts being deferred:
 systemctl restart ModemManager.service
 /etc/needrestart/restart.d/dbus.service
 systemctl restart packagekit.service
 systemctl restart polkit.service
 systemctl restart ssh.service
 systemctl restart systemd-logind.service
 systemctl restart unattended-upgrades.service
 systemctl restart user@0.service

No containers need to be restarted.

No user sessions are running outdated binaries.

No VM guests are running outdated hypervisor (qemu) binaries on this host.
root@localhost:~# reboot
root@localhost:~# Connection to 66.228.33.58 closed by remote host.
Connection to 66.228.33.58 closed.
After the VPS comes back up, I can resume my work by SSHing into the VPS again.
Maintaining A Session Without Being Logged In
A critical tool for running scripts without maintaining an active login is screen. It comes pre-installed with Ubuntu, but other distributions may not include it inthe base install. If not, simply add it using the similiar instructions below.
screen will allow you to create a virtual shell that you can attach and detach from. This virtual shell allows all programs running inside it to maintain operation even if you disconnect from it.
It is controlled via keyboard shortcuts, usually prefixed with CTRL+a.
Launch screen immediately, then press “space” to dismiss the welcome message. From within screen, you’ll notice that the terminal looks the exact same. I want you to type some text, then use the shortcut CTRL+a+c. You’ll notice that a new terminal appears. You now have two virtual shells running inside your screen session. You can move between them with the shortcut CTRL+a+n. You can also split the window by using CTRL+a+S (splits horizontally) or CTRL+a+| (splits vertically). When you have a split window like this, you can move between panes using CTRL+a+<TAB>.
Here is an example of a horizontally split session, showing two virtual shells.

Finally, you can detach from screen using CTRL+a+d, and then re-attach to it with the command screen -r.
You can close a virtual shell with the shortcut CTRL+d, or by the built-in command exit. When the last virtual shell within a screen session is closed, it will close that session and return you to the terminal.
Installing Packages
The package management system for Debian and Ubuntu is called apt. It manages all aspects of package installation on the system.
Since we will be working with Brownie and the degenbot codebase, we need to intall the necessary Python development libraries, then the package installer pip.
root@localhost:~# apt install python3-dev
[...]
root@localhost:~# apt install python3-pip
[...]
Creating a Local User
It’s always best to work in Linux as a normal user. Always operating as root is dangerous, because nothing is restricted. Any compromised executable or script can wreck your day.
Here I will create a dedicated devil user, then add it to a special group sudo that allows me to perform “superuser” actions, like package installation, when needed.
root@localhost:~# adduser devil
Adding user `devil' ...
Adding new group `devil' (1000) ...
Adding new user `devil' (1000) with group `devil' ...
Creating home directory `/home/devil' ...
Copying files from `/etc/skel' ...
New password:
Retype new password:
passwd: password updated successfully
Changing the user information for devil
Enter the new value, or press ENTER for the default
        Full Name []: Bowtied Devil
        Room Number []:
        Work Phone []:
        Home Phone []:
        Other []:
Is the information correct? [Y/n] Y

root@localhost:~# gpasswd -a devil sudo
Adding user devil to group sudo
Now I will disconnect from the VPS and reconnect over SSH as my new user.
devil@hades:~$ ssh devil@66.228.33.58
devil@66.228.33.58's password:
Welcome to Ubuntu 22.04 LTS (GNU/Linux 5.15.0-33-generic x86_64)

[...]

devil@localhost:~$
Whenever you see the number symbol, this indicates that the current user has regular privileges. When you see the pound / hash symbol, this indicates that the current user has superuser privileges.
Superuser and Python Package Installation
Now I’ll demonstrate how to gain “superuser” privileges using sudo (a reference to “superuser do”).
devil@localhost:~$ sudo apt install python3-venv
[sudo] password for devil:
Reading package lists... Done
Building dependency tree... Done
Reading state information... Done
The following additional packages will be installed:
  python3-pip-whl python3-setuptools-whl python3.10-venv
The following NEW packages will be installed:
  python3-pip-whl python3-setuptools-whl python3-venv python3.10-venv
0 upgraded, 4 newly installed, 0 to remove and 0 not upgraded.
Need to get 2,474 kB of archives.
After this operation, 2,888 kB of additional disk space will be used.
Do you want to continue? [Y/n] Y
[...]
Now I’ll create a dedicated directory for storing the bot scripts, then make a new virtual environment to keep everything clean.
devil@localhost:~$ mkdir bots
devil@localhost:~$ cd bots
devil@localhost:~/bots$ python3 -m venv .venv
devil@localhost:~/bots$ source .venv/bin/activate
(.venv) devil@localhost:~/bots$
Now I’ve created and activated a virtual environment to store my bot-related Python packages. With this active, it’s time to install the familiar brownie, websockets, and vyper packages.
devil@localhost:~/bots$ source .venv/bin/activate
(.venv) devil@localhost:~/bots$ pip install eth-brownie scipy requests
Collecting eth-brownie
  Downloading eth_brownie-1.18.2-py3-none-any.whl (230 kB)
     ━━━━━━━━━━━━━━━━━━━━━━━━━━━━━━━━━━━━━━━━ 231.0/231.0 KB 10.6 MB/s eta 0:00:00
[...]

(.venv) devil@localhost:~/bots$ pip install --upgrade websockets

[...]

Successfully installed websockets-10.3
Pip will complain about a package incompatibility, but I’ve verified that websockets version 10.3 works perfectly with Brownie 1.18.2. Also it’s required to use websockets’ very helpful asynchronous iterator functionality — async for websocket in websockets.connect() — which version 9 did not offer.
Sync With Git
You can use the command line tool git to synchronize with my degenbot GitHub repo.
(.venv) devil@localhost:~/bots$ git clone https://github.com/BowTiedDevil/degenbot
Cloning into 'degenbot'...
remote: Enumerating objects: 405, done.
remote: Counting objects: 100% (88/88), done.
remote: Compressing objects: 100% (64/64), done.
remote: Total 405 (delta 48), reused 62 (delta 24), pack-reused 317
Receiving objects: 100% (405/405), 72.43 KiB | 4.53 MiB/s, done.
Resolving deltas: 100% (189/189), done.
(.venv) devil@localhost:~/bots$ ls
degenbot
Set Up SSH Keys
I recommend using SSH keys for authentication. If you’re using Linux or MacOS, generate a public-private keypair using ssh-keygen, protected with a password if you choose, then copy the public key to your VPS.
Local
devil@hades:~$ ssh-keygen
Generating public/private rsa key pair.
Enter file in which to save the key (/home/devil/.ssh/id_rsa):
[...]

devil@hades:~$ cat .ssh/id_rsa.pub
ssh-rsa AAAAB3NzaC1yc2EAAAADAQABAAABgQDZOenjE1Dvb364XfduiRgJUqOOZN8jyqtIw7TyvnvhrK5ata44n7lc3ta9QvVP/3vhx8oWq234LNF0RRbo144NDbBwcFzi+Yb8WJPu8kRZCAkYSGS0mnLvCuyEFnIvy7d78wFiu4k68ic4Spz0V4iXKim91BY0bXo3Eo8TrhK3az7LCowLP37l0jloAv8z9XS5G4mD34q28KzYj9fgNpNYonQ+YTubokp2Jgdk7V+JJKcyWAzMcJgRN2sCoVK3+25uRxnIIEi28CRrcuq/Of/jTJDg4b3P4LtdhlrZyWlhlrCw8VJbxu/r5cYynZWS6ioJD50iyhEdhzznyA7jnI9NQrgd7tis4wHKmEZMSb7lCoC1r6Y49J26yxi0A9XgwX4G431PsB7CBP8pjfx/5WxNfRbqT9JUCL8L0+h3nf4pJe+7fPQzDaMD5adCgOLbnbldOzgqf9Fol977dmOO0NxyJ+HbUQBMeD7qiwkjTwPFKOFGseoSR/v7Woys+FEEi6U= devil@pop-os
Remote
On the VPS, you can use vim or the more user-friendly nano to paste the contents of id_rsa.pub into a file named authorized_keys inside your .ssh directory.
devil@localhost:~$ mkdir .ssh
devil@localhost:~$ nano .ssh/authorized_keys

[paste the key]
[save with CTRL+k]

devil@localhost:~$ exit
logout
Connection to 66.228.33.58 closed.
Now reconnect and confirm that you are not prompted for a password (unless you set one using ssh-keygen).
Once you’ve confirmed that SSH is using keys instead of login passwords, you can disable the password option within the SSH server.
devil@localhost:~$ sudo nano /etc/ssh/sshd_config

[find the line that reads: PasswordAuthentication yes]
[change it to no]
[save and exit]

devil@localhost:~$ sudo systemctl restart ssh
Caution
Obviously, don’t lose your SSH key! Also never share your private key, which is saved in ~/.ssh/id_rsa.
Moving Files Around
With SSH running, copying files around is incredibly easy. You can use scp (secure copy) to copy files to & from your VPS. For example, now I’ll copy a bot off my workstation to the VPS.
devil@hades:~$ scp bots/snowsight.py devil@66.228.33.58:~/bots
snowsight.py                     100%   60KB 230.4KB/s   00:00
If you have Brownie networks and users already created, now is a good time to copy them over as well.
devil@hades:~$ scp -r .brownie/accounts/ devil@66.228.33.58:~/.brownie
test_account.json                 100%  487     4.7KB/s   00:00
degenbot.json                     100%  487     4.3KB/s   00:00

devil@hades:~$ scp -r .brownie/network-config.yaml devil@66.228.33.58:~/.brownie
network-config.yaml               100%   11KB  94.8KB/s   00:00
LFG
Now you’re free to create a new screen session, start your bots, then disconnect at any time.
For those using Windows, as of Windows 10 there is a built in OpenSSH client. So no need for Putty anymore
https://docs.microsoft.com/en-us/windows-server/administration/openssh/openssh_install_firstuse
For those using Visual Studio Code, they have extensions for remote development so you can connect to your VPS from your local machine. Highly recommended.
https://code.visualstudio.com/docs/remote/ssh
I setup everything correctly, however, I am getting this error. Does anyone have a solution?
Error - (.venv) bot@localhost:~/bots$ python unstablewatcher.py
Enter password for "test_account":
Loading Contracts:
Fetching source of 0xd586E7F844cEa2F87f50152665BCbc2C279D8d70 from api.snowtrace.io...
Fetching source of 0x130966628846BFd36ff31a822705796e8cb8C18D from api.snowtrace.io...
Traceback (most recent call last):
File "/home/bot/.venv/lib/python3.9/site-packages/brownie/project/compiler/solidity.py", line 90, in set_solc_version
solcx.set_solc_version(version, silent=True)
File "/home/bot/.venv/lib/python3.9/site-packages/solcx/install.py", line 219, in set_solc_version
_default_solc_binary = get_executable(version, solcx_binary_path)
File "/home/bot/.venv/lib/python3.9/site-packages/solcx/install.py", line 194, in get_executable
raise SolcNotInstalled(
solcx.exceptions.SolcNotInstalled: solc 0.8.2 has not been installed. Use solcx.install_solc('0.8.2') to install.
During handling of the above exception, another exception occurred:
Traceback (most recent call last):
File "/home/bot/bots/unstablewatcher.py", line 17, in <module>
mim_contract = Contract.from_explorer('0x130966628846bfd36ff31a822705796e8cb8c18d')
File "/home/bot/.venv/lib/python3.9/site-packages/brownie/network/contract.py", line 1186, in from_explorer
build_json = compiler.compile_and_format(
File "/home/bot/.venv/lib/python3.9/site-packages/brownie/project/compiler/__init__.py", line 121, in compile_and_format
set_solc_version(version)
File "/home/bot/.venv/lib/python3.9/site-packages/brownie/project/compiler/solidity.py", line 97, in set_solc_version
install_solc(version)
File "/home/bot/.venv/lib/python3.9/site-packages/brownie/project/compiler/solidity.py", line 105, in install_solc
solcx.install_solc(version, show_progress=True)
File "/home/bot/.venv/lib/python3.9/site-packages/solcx/install.py", line 433, in install_solc
process_lock = get_process_lock(str(version))
File "/home/bot/.venv/lib/python3.9/site-packages/solcx/utils/lock.py", line 28, in get_process_lock
_locks[lock_id] = UnixLock(lock_id)
File "/home/bot/.venv/lib/python3.9/site-packages/solcx/utils/lock.py", line 40, in __init__
self._lock_file = self._lock_path.open("w")
File "/usr/lib/python3.9/pathlib.py", line 1252, in open
return io.open(self, mode, buffering, encoding, errors, newline,
File "/usr/lib/python3.9/pathlib.py", line 1120, in _opener
return self._accessor.open(self, flags, mode)
PermissionError: [Errno 13] Permission denied: '/tmp/.solcx-lock-0.8.2'